The Layering Library (MILA) Part 2
In this post we will go over the material properties and base phenomenon (layers) of the MILA material.
Part 1 can be found here and the Inside mental ray blog post can be found here.
The default layout of the MILA material is designed to give the user access to the most common selections. There are four sections (top to bottom):
- Components – this is where you add and see components created as mixes or layers (covered later)
- Base – the base acts as the main bottom layer of the material and as a storage space for built-in presets (covered here)
- Material Properties – overall controls for the material that apply to everything (covered here)
- Extra Attributes – you can add additional named framebuffers here for output when the material is run. You can find more information on this here. (Covered previously and re-linked at the bottom of this post)
I will begin with Material Properties:
Visibility was known previously as “cutout opacity” and lets the user cutout or remove parts of the geometry completely. This is a scalar control and expects a range from 0.0 (invisible) to 1.0 (opaque). The blue sphere in this image has a checker connected to the visibility.
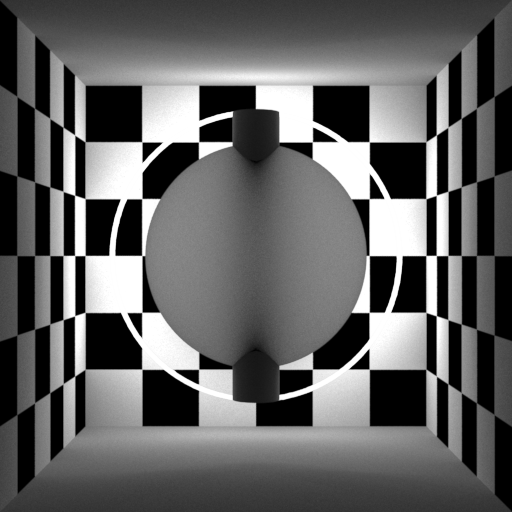
Thin-walled allows you to create a shell of a material where rays are not refracted. This would resemble a hollow object. The top image is solid, the lower is thin-walled (on).
Show Framebuffer – allows you to render the material with the selected framebuffer into the beauty. This can be enumerated for an easier UI selection if you desire. You can find this information in the documentation.
Overall Bump applies a bump to all the layers contained in the material. Otherwise you can add the bump manually per layer for specific effects. This will be most common. Side note: A bug was found before release that causes the bump in MILA to generate negative pixel values. This was fixed but Maya was already frozen. A next release will solve the issue.
Next is the Base section.
DIFFUSE BASES
Diffuse bases are often a mix with another component. You can see the control for “Diffuse Weight” where 1.0 = diffuse tint result. As you decrease this, the result becomes more scatter, translucency, etc. based on your chosen base. This is because most usage scenarios will want at least some diffuse mixed together with the result to be more realistic and/or faster. In the mia_material you had a weight for the diffuse color. This is a similar control. Without additional layering you can create:
- paper
- wood
- dry clay
- dirt
- simple SSS (no glossy/specular reflection on top)
- rust
- etc.
REFLECTIVE BASES
Reflective bases often have a glossines blend that mixes with a diffuse base component and shares the same color (with the exception of plastic and paint). Reducing the blend to 0.0 removes the glossy or specular reflectivity to reveal a diffuse base. Without additional layering you can create:
- plastics
- metals
- brushed metals
- leathers
- etc.
TRANSMISSIVE BASES
Transmissive bases are often glossy or specular reflection layered on top of a transmissive base component (these lack a diffuse component as it is unnecessary). Reducing the reflective weight does what you’d expect, it reduces the glossy or specular reflectivity. Without added layering you can create:
- glass
- frosted glass
- liquids
- etc.
In all of the above cases where IOR is present, you can leave the weights at 1.0 and use the IOR as a physical directionally weighted energy control. This is similar to “use ior” in the mia_material under the BRDF controls. Common settings:
- 1.33 – water
- 1.5 – glass
- 4.0-6.0 plastic
- 20.0 and higher – metals
- You can find other ior values here listed as n: List of Refractive Indices
This replaces the Schlick control curve the mia_material had but is simple. The custom Schlick Curve is present when layering above a base (covered later)
This rollout gives you the usual bases most artists would start with before adding a layer on top. You may or may not need more than what the base provides. When you first create a MILA material the Base defaults to “Diffuse” which as you might expect is like a Lambert shader with a Roughness parameter to create something like Oren-Nayer roughness. Beneath this is a Contribution section for direct and indirect (non-physical) scaling discussed near the bottom in the previous section.
Contribution: What’s an example of direct and indirect weighting?
Indirect will only render indirect sources of light, that is, light that has reached the object through interaction with other objects. Direct will only render direct source of light to the object. Keep in mind an object light has a duality where it’s both an indirect and direct object. In the future this may not be the case.
Below are renders with a chrome ball and environment light inside a box with a hole. The box is hidden. Top is indirect only so the walls are rendered in the ball. Bottom is direct only so that only the light source (IBL) is shown in the ball. Adding the results gives you the complete render with both contributions. This is also how the MILA native framebuffers for direct and indirect operate so you can scale this in 2D post.
Below is each setting and a brief description. I will skip over the first one, diffuse.
Diffuse (scatter) base. This is a combination of a scatter and a diffuse material. These are mixed together with a diffuse weight so that you can mix in a little diffuse with your scatter. The scatter and diffuse tint are shared. More details over the scatter shader will follow but are the same types of controls found in SSS2 shaders provided in previous Maya releases. This time the scatter component does not generate a lightmap and instead uses a caching mechanism on the fly that is multi-threaded.
Notice in the below render that the scatter spreads as the color chosen in the front and back scatter options. The scatter is based on the RGB choice in the color swatch that is a color modifer (different than the scatter node if layered elsewhere). This is a simplified mode of scatter. In the scatter node itself each channel (R, G, or B) spreads based on the amount each represents. For example: RGB of 10 5 2 means red scatters 10, green scatters 5, and blue scatters 2. Red will be the predominant color since it scatters further than the others. Remember to use physical settings in rendering, including correct Final Gather choices or you may have artifacts.
Diffuse (translucent) can be seen here with diffuse weight set to 0.0. It’s a good example for things like thin blades of grass, paper, etc. The sphere here is flattened some and a cylinder is put through it and backlit. Diffuse transmission is best suited for thin/2D objects. Be sure and use correct physical Final Gather settings for best results. Correct indirect lighting will be important in using these and future materials.
Reflective mixes a diffuse layer with a glossy overcoat. A simple weight is used to blend them.
Reflective Anisotropic adds anisotropy control.
Reflective Plastic adds a fresnel control for the reflection amount and removes the anisotropic control.
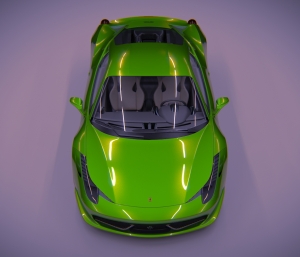
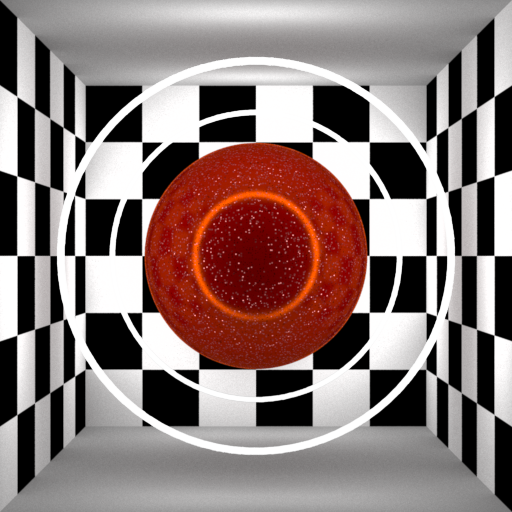
Reflective Paint emulates a car paint-like base without the top clear coats that would be added through layering. Here I have tweaked a few settings and changed the diffuse tint to red. Notice the Flakes parameter now has multiple noise options for rendering including Cellular noise patterns and circular style flakes where you can alter their size. This paint will be physically correct, unlike the paint material option previously used for mental ray.
The paint material has quite a few options and operates somewhat differently than the old car paint material. This will be worth a post on its own like the scatter node at some point. I have also attached a render from Holger (“Kzin” on many forums) showing a car paint phenomenon using MILA in Softimage.
Transmissive is a basic glass material for solid objects with a roughness parameter that’s tied together along with the ior for reflection and transmission.
Transmissive Clear removes roughness from the controls and makes for simple glass-dielectric shading.
Transmissive Distance is like Transmissive but adds a control for distance falloff. This allows the control of rays as they travel through the medium. Lots of times artists use this to create deeper colors or things like colored liquids similar to cola. Here there is a little roughness and a light blue falloff that looks deeper blue with the distance reduced.
Extra Attributes are as described previously in the MILA Framebuffers post as well as the MILA updates with an example. Below you can see that the Extra Color buffer can be written even if not primarily visible to the camera. This means mattes in reflection and refraction can be written out for easier color correction in 2D.
The next post on MILA will go into Layering details including the concepts behind mix vs layer, energy conservation, and organizing the layout.
Posted on April 20, 2014, in Uncategorized. Bookmark the permalink. 61 Comments.








Just wanted to say thank you for these articles. They really help to dive into mila 🙂
Just quickly posting here since I have no idea where this might be better suited.
I heard in the nVidia presentations that they will provide more templates to enable, or to enhance the mental ray workflow in Autodesk products, or at least in maya… so my question is: where should I begin looking for them?!
The UI scripts haven’t been posted yet. It’s possible that they will wait until the first Service Pack if they need testing.
Coming back with more questions: would you happen to know the equivalent workflow with MILA shaders to the older MIA with AO detail enabled? I can’t find anything regarding this.
Thank you!
If you look here: http://docs.autodesk.com/MENTALRAY/2015/ENU/mental-ray-help/files/shaders/layering/material.html#global
You will see the string options for “diffuse detail”. However, this is somewhat deprecated. The idea is that in regular rendering your GI solution should be good enough to omit this as this duplicates work and slows things down. Note that this version is more accurate than the AO detail settings and slower (it’s color bleed and global for the whole scene with contained MILA materials)
Thank you immensely! 🙂

I assume that these will go into the miDefaultOptions node?
I’ve testing for about 10 minutes but so far it doesn’t seem to work. ]
Here’s a screenshot of what I have for now:
Am I missing something?
Holy crap, Quality 64 is HIGH! This is a “quality” parameter. Not a rays/subdiv/accuracy parameter. Try: 1.0
Remember, this is an indirect light effect, if your GI is already good enough then this really adds nothing.
🙂
Yes, sorry about that – I set it to 64 in anger.
I’m trying to replicate the MIA AO detail workflow, using really-really low FG settings and forcing (well trying to) this detail distance to add some detail where geometry interacts.
There is something broken here I think… either in the software, or the user.
It works for me, the link to this image is MILA diffuse detail “on” with Quality 3.0 and a MILA ball with an emission layer set to 1.0: https://db.tt/vNmi9I1F
There are no lights or GI in the scene. File can be found here: https://db.tt/GGdaVd0r
[Corrected file link, Linux clipboard sucks]
Working! I… much appreciated, honestly!
Thank you.
Thanks for the effort David, it’s really helpful. I just tried to create a RGB material ID pass through the Extra Color tab. The ID colors are reflecting just fine in reflective surfaces, but as soon as i add an ID color to the reflective surface mila itself, all of the reflected id’s are gone because the surface is now fully covered by it’s own id color. Is there a way to just get an additive result in the Extra Color framebuffer so it maintains all reflected ids?
I usually do two things: ID in the extra color to secondary mattes, and an ID pass using the custom color in the Maya passes for the ID itself.
I usually generate an ID pass with the Maya buffers and then another one with the extra color. That way I can isolate the object from its effects (similar to a way in LPE)
Hello David,
I have started a project with the MILA shader.
I like it very much but I have a big problem with artefacts with reflection. On your post of May 6 2013 (new features) you talk about a clamp option.
Is this option there in Maya 2015? If not is there a way to avoid artefacts/fireflies in reflections?
thank you.
You can use the Clamp string options found here: http://docs.autodesk.com/MENTALRAY/2015/ENU/mental-ray-help/files/shaders/layering/material.html#global
There may still be noise in the reflection as it does not clamp direct contribution, only indirect between MILA shaders. This is something they will improve.
no, not the string options! 🙂
ok I have tried it and the artefacts as desappeared! thanks a lot!
I dont know if it is perfect I have to check in animation but it look very good on an image.
It is strange that this option that seems very important is not accessible directly, in my case the shader is not usable without it.
Whether or not it’s useful is dependent on your light setup and while we might all default it on, the side-effect is less dynamic range in your resulting render. This isn’t always a good thing.
Integration of MILA in Maya 2015 is initial, but a UI was shown at GTC that shows these settings as well as others exposed for MILA in the render settings. These UI are in planning stages so you will see these controls offered later.
You can find a preview of that UI on this blog along with a link to the actual presentations at GTC: https://elementalray.wordpress.com/2014/03/30/gtc-presentation-online/
The new UI is interesting, I hope we will see that soon in a future update.
(I also like the use GPU for GI!)
Testing things a bit I noticed there is a four-fold increase in rendertime when we associate passes (diff, ind, ref, refr and spec) to a simple bunch-of-spheres scene when using the mila shaders in 2015sp2. Anyone else experience that? This would pretty much render the whole thing useless…
When you add passes, mental ray is set to sample the passes for noise and add samples if it sees that. This draws more samples globally. We have been turning OFF “contrast all buffers” in the framebuffer rollout of the render settings. Your render time will be consistent if you add passes. However, your passes might be noisy, but when added together they will match your beauty. This is usually good enough. We typically composite the beauty and only use passes sparingly to adjust in small amounts. This is the preferred workflow and should work for you.
The extra color, vector layers don’t do nothing to the physical appearance of the render, they are strictly for frame buffer purposes ?
Correct.
When I apply a bump map within any layer, for example a mix:glossy reflection, then remove the bump, the object does not revert back to its state before applying the bump. Suppose the object is red, as is mine. When I remove the bump, half of the object is black, it’s odd, would it have anything to do with the bump, or the MilA shader in general ?
Make sure it’s actually disconnecting everything. You’re adding a bump node, correct?
It doesn’t automatically convert a procedural texture to a bump (I have Softimage workflow embedded in my head) 🙂
It doesn’t automatically add a bump node yet. You have to do that manually.
Yet, it may be coming I assume 🙂
More is coming for sure and more than just MILA….
Is it stuff that will “blow our socks off” ? I assume you have insight but can’t share that information.
The chip in my neck will blow my head up. But you’ve seen the announcement for MDL and the prototype for the new GI. The new GI will continue to improve and simplify workflow.
I have removed all bump procedural textures from any, and all layers. The problem persist, have of my object is black, the other half is red ?
In the viewport or render? Make sure if you graph it, it is completely disconnected.
In the render. I have graphed it, hrm.
Hi! I can’t seem to get the mila shaders to draw in the viewport (2.0) on OSX 10.9.5. Is it because of the AMD card(s)? They render accurately though (and they update in the material swatch appropriately as well). Running a trial of 2015 service pack 5.
MILA was not connected to VP in Maya for the last release. But they have plans to solve viewport rendering.
Thanks for the fast reply, David! Good to know.
David, how would you go about adding none physical correct things to the MILA shader? Thats the thing that kinda eludes me right now..
Say you want to add a fresnel like white edge using a ramp connected to a samplerInfo. How would I go about doing that so that the border effect would looks like it was added like a surfaceShader on top. I guess I’m looking for the mia’s additional color slut on the MILA.
add it as emissive… Litterly seconds later.. Sorry about that.
Hi
Did you get mila_adapter working?
I’m asking this because when I try to plug the result from mia material to the input of mila_adapter and plug that into mila material I get a warning msg in script editor.
“user” not found in mila.py!
this happen with all version of mental ray running Maya 2015 or maya 2016 same thing!
mila_adapter was deprecated. It was purely a hold-me-over attempt to handle features users wanted that weren’t part of MILA. As integrated, MILA is designed to work with its own components to provide the best compatibility and performance. This is probably desired by Autodesk so that no one is troubleshooting issues from using legacy nodes in a new network.
Thank you for a quick reply!
Hi David
When choosing mila reflective with IBL or physical sun & sky or any maya or mental ray light, and render the scene, I get a glow cover all object affected by mila material.
So I added another object with mia_× and the glow cover only the objects with mla material.
So this is maya shader glow ! Why is that happen?
Yes I can zero out all the parameters of maya shader glow, or simply uncheck ” Render Maya Glow” in configuration tab.
Is this normal ?
What version of Maya? Something is writing to framebuffer 0 which is used for Maya Glow. I would report it with a scene and turn off Maya Glow (post effects) in the meantime.
What do you mean by reflective based to create brushed metal, as an example ?
Oh I forgot to mention it’s Maya 2016.
? I wanted to know what David meant by what he said to create a brushed metal effect ?
Hi Christopher,
Are you asking how to create brushed metal with mila marerial?
Yes, the MILA Layer Material !
Hy David. I’m never found a distance on reflection like mia_material. There’s no settings like mia? Thank you
Afraid that’s not exposed for MILA. However, such a thing may become part of other materials like MDL in the future. In measuring BSDF data they’ve found such a thing is physically plausible. Are you interested in doing this for an artistic reason or efficiency?
Mentalray for Maya2016 SP1
When creating mila_material, the Script Editor return Error:…/Scripts/mentalrayCustomNodeUI.mel line 362: RuntimeError: …mila.py line 384: the destination attribute ‘ mila_material1.vpDiffuseColor’ cannot be found.
Still Mila_adapter not working!
Waiting for another fix!
Thanks.
Given the future direction of layering BSDF materials I don’t expect the MILA adapter will ever be supported. That would be a step backwards. Using layering and MDL would get you better performance and more flexibility anyway. It’s a win-win.
Hi David. and sorry for delay. I’m interesting it for artistic reason. I’m never figure out how i’m doing this.
Hi David, I’m a teacher, and one of my students asked me how would you go to make something with a velvet-like look. And I realized if you go for a reflective-anisotropic base you can’t control separately the base and the reflection color. Any recomendations?
You can use a diffuse base and add another glossy anisotropic layer on top with fresnel weighting. The preset base is meant to be metallic so that’s why it doesn’t expose color for both. 🙂
Thanks! That’s what I thought, the funny thing is, (correct me if I’m wrong) you can’t create a new mila_mix_reflective_aniso, you have to copy it and connect it…
That mix node is a builtin phenomenon. I don’t see why you couldn’t just add a glossy anisotropic layer from the regular menu. You don’t have to have another aniso mix. Just use the ones in the menu. 🙂
Hi! Thanks for the tutorial.
However, I have some problem with Mila Material.
I can’t export Mila Material. Everytime I tried to export my model, the Warnings and Errors pop out and said that “The plug-in does not support the following material types:
Material mila_material3 will be exported as a grey Lambert material”. The reason I need to export it because I need my object to be used in Unity.
Thankyou
Pingback: The Layering Library (MILA) Part 1 | elemental ray
Pingback: Maya 2015 Mental Ray MILA | CGNCollect
Pingback: Buoys | Black Light