Category Archives: scripts
Texture Publishing to mental ray
Nailing down a good texture pipeline can be confusing! Hopefully this clears up some of the whys and hows for efficiently handling texture of images with mental ray, providing a straightforward solution to a complicated problem.
[You can also find a test example on the ARC forum here: https://forum.nvidia-arc.com/showthread.php?13316-Maya-and-mental-ray-texture-caching ]
Texture Filtering
When sampling a textured object, color information is lost between sampling points. This is because a single sample only calls a single texture pixel (texel). Information for texels that don’t get sampled is lost – which can be a real problem if that information was important. For highly detailed textures or for textures with regular patterns this sampling limitation may manifest itself as an artifact such as a moiré pattern.
Aliasing-free texture sampling is restricted by a mathematical limitation known as the Nyquist rate which states that the number of samples required to adequately estimate a signal must be at least twice the noise frequency. This means there are only two options to remove rendering artifacts caused by noisy textures: sample more or filter the texture.
Filtering a texture removes high frequency noise from images making them easier to sample. While this does away with many potential aliasing artifacts, it also removes detail leaving your textures looking fuzzy. This is not a problem for textures that occupy limited screen space because that is detail that would have been lost anyways. However it is a problem for textures that occupy lots of screen space because that detail might have been visually important. Luckily for us, texture mipmapping provides a convenient solution for both situations.
Mipmapping
Mipmapping (from the Latin phrase multum in parvo meaning “much in little”) is the process of pre-filtering one large image into many smaller images of progressively decreasing resolutions. The largest images retain detail that the smallest images lose to filtering. These mipmap images are generally organized into a multi-resolution file sometimes known as a pyramid image.
The advantage of multi-resolution images is that they provide mental ray with the ability to read from appropriately sized pre-filtered images based on the amount of screen space that the textured object occupies. This allows superior anti-aliasing performance while using less samples.
For the above renders, mental ray read from higher and higher mipmap levels as the checkered texture receded into the background. The highest mipmap levels have lost virtually all detail and appear as a middle grey. As a result of filtering, mipmapping reduced the total number of eye rays from 5552111 to 5144177!
It is advisable to use mipmapped textures. Generally, mipmapped textures should be used with the filter declaration (see miFilter attribute below). The purpose of the filter declaration is two fold:
- filter tells mental ray to mipmap images on demand if they are not already so. When computed on demand, full upper pyramid layers are computed and kept in memory, totaling 1/3 of the base (largest resolution) image.
- You can control how selective mental ray is when choosing mipmap levels (and thus the blur of the textures) by setting filter size (see miFilterSize attribute below). A filter size above 1.0 increases the texture blur by reading from a higher level (lower resolution) mipmap. A filter size below 1.0 reduces texture blur by reading from a lower (higher resolution) mipmap. Generally filter size should correspond to the number of times a texture repeats itself in UV space, i.e. an image that repeats itself 10 times should use a filter size value of 10.0.
Elliptical Lookup
Texels are square when viewed with photoshop or some other 2D application, but this is not always the case when rendering in a 3D environment. When textures are rendered at glancing angles, the screen space each texel occupies become distorted – i.e. more texels may fit into a screen pixel in one direction than another.
To avoid artifacts caused by symmetric filtering for textures viewed non-symmetrically, some textures require an additional elliptical lookup on top of mipmapping. Elliptical lookup works by projecting the circular area surrounding a sample onto the texture image, resulting in an ellipse. The texels within the ellipse are then averaged resulting in a more accurate return value.
The above render shows the artifact-free result elliptical lookups provide. Not only is the strange middle grey circle gone, but the number of eye rays has been further reduced to 4705444!
While elliptical lookup is relatively fast, not every textured object requires it. To avoid unnecessary render time, elliptical lookup should be enabled on a per-texture basis. The default lookup size of 8.0 is generally a good starting point for most situations. Reducing this value will speed up render times, but may reintroduce artifacts.
Note: mental ray will mipmap on demand if elliptical filtering is specified for non-pyramidal images.
Tiled and Cached Textures
Keeping all texture information in memory can become quite expensive for large scene, especially when using pyramid images. mental ray supports texture caching for certain tiled texture formats. When texture caching, only certain tiles of a texture are loaded into memory. These tiles are automatically removed or replaced by recently accessed ones, dramatically reducing the memory consumption during rendering.
Starting with mental ray 3.9, texture caching can be specified globally using the “{_MI_REG_TEXTURE_CACHE}” registry variable set to “on” / “off” / “local”. The defualt “local” means that only local textures are cached (see miLocal attribute below). Native .map files are always considered local. It is important that local textures be saved locally or on a caching file server where images can be shared across multiple machines (on a render farm) to avoid network overhead.
Another registry variable, “{_MI_REG_TEXTURE_CACHE_SIZE}”, exists to set a maximum size for the texture cache in megabytes (e.g. “512” corresponds to 512MB). mental ray will dynamically determine the cache size for the default value of “0”.
It is advisable to use tiled/cacheable textures to reduce memory consumption.
Image Formats and Conversion
- OpenEXR (.exr)
- Can be saved as mipmap pyramid
- Can be tiled/cached
- Personally recommended by me!
- mental ray’s native memory-mapped image (.map)
- Can be saved as mipmap pyramid
- Can be tiled/cached
- TIFF (.tif)
- Can be saved as mipmap pyramid
- Can be tiled/cached
- note: Photoshop has been known to do some odd things to tifs (like layering)
- Bitmap Image File (.bmp, .dib)
- Can be tiled/cached
- Maya IFF (.iff)
- Can be tiled/cached
imf_copy (which ships with mental ray and Maya) is a convenient command-line tool that can be used to create mipmapped-tiled images. For example, I could run this command if I wanted to publish my working TIFF texture to an mipmapped-tiled zip-compressed OpenEXR texture:
imf_copy -p -r -k zip working_texture.tif published_texture.exr
Alternatively, exrmaketiled and/or the openimageIO toolkit can provide increased flexibility for publishing textures.
Setting up the Maya file node for mental ray
If using a pre-mipmapped image (which you should be):
- File Attributes > Filter Type → Mipmap (This enables the miFilter option)
- File Attributes > Pre Filter → off (we are using mipmapping with the option of elliptical lookup instead)
- mental ray > Override Global Auto-Conversion Settings → on (I don’t trust any global Maya auto settings)
- mental ray > Convert File To Optimized Format → off (texture has been already mipmapped!)
- mental ray > Advanced Elliptical Filtering → generally off, on if this texture is producing rendering artefacts
- Extra Attributes > Mi Local → preferably on for texture caching, otherwise off.
- Extra Attributes > Mi Filter Size → generally 1.0, higher for repeated textures.
Python script to add texture attributes to all Maya file nodes in a scene:
import pymel.core as pm

# Add Extension Attributes to all file nodes.
pm.addExtension(nt="file", ln="miLocal", at="bool")
pm.addExtension(nt="file", ln="miFilterSize", at="float", dv=1.0)

# Delete Extension Attributes from all file nodes.
pm.deleteExtension(nt="file", at="miLocal", fd=True)
pm.deleteExtension(nt="file", at="miFilterSize", fd=True)
Last Notes
As a rule-of-thumb, I recommend using mipmapped-tiled OpenEXRs for all textures and to declare them local. The one exception is the environment map which will only benefit from tiling, not mipmapping. To pre-blur the environment, try using the mia_envblur shader combined with “Single Env Sample” on material shaders.
A formalized texture publishing step between texture creation and rendering provides an excellent opportunity to both optimize image formats and linearize data. For more information on colorspaces and linear color workflow, see Linear Color Workflow(s) in Maya.
fgshooter UI for Maya
mip_fgshooter used to achieve flicker free final gather
mip_fgshooter is a mental ray production shader that allows you to shoot final gather points from multiple cameras instead of just the render camera. These virtual FG cameras can greatly reduce flickering by providing stability to final gather points between frames. Increased stability reduces the need for overly aggressive final gather settings on difficult-to-light situations and can lead to faster render times as well as improved image quality. This offers similar advantages to baking FG points (see Flicker-free Final Gather in dynamic animations) but with a significantly simpler workflow. Also, I have put together a python script (complete with a user interface!) that will make using the fgshooter easy.
Thanks to The Mill for letting me post this script.
Final Gather Flicker
Generally, flicker is a result of changing indirect lighting contribution computations between frames. This indirect contribution computation is based off of the perceived indirect lighting at each of the FG points. Because the location/number of FG points is camera/geometry dependent, and cameras/geometry move between frames in animation, subtle differences in the locations of the FG points causes flicker.
For instance, if part of the scene geometry is visible to the camera in one frame and not visible in another frame, you might get flickering if the indirect contribution around this geometry is important. Additional FG cameras that either do not move or can view geometry that might not be visible to the render camera for every frame, enable you to stabilize the indirect lighting contribution computations.
For the HTC advertisement above, the green laser lights that write on the buildings were causing FG flicker because their intensity was so great. When the camera moved slightly, additional FG points inside the buildings would significantly change the indirect lighting contribution computations. Even brute force indirect lighting flickered because of the addition/loss of a few primary/eye rays changed the QMC determinism so much! We used stationary FG shooter cameras to anchor the FG points geometrically and kill the flicker at minimal cost to render time (much faster actually if you consider the original unnecessarily high FG settings).
Using the fgshooter UI
First off, you need to expose the mental ray production shaders if you have not already. To do that, run this simple MEL command and then restart Maya:
optionVar -intValue "MIP_SHD_EXPOSE" 1;
Because focal distance and aspect ratio information is passed via the scale attributes of the camera transform matrix to the mip_fgshooter shader, it can be somewhat difficult to use inside of Maya.
I have provided a script that will make it fairly easy to set up an fgshooter camera(s). To install the script download the compressed python file from the bottom of this post. Place the unzipped python file inside of one of your script’s paths. Now, create a custom fgshooter button from the shelf editor. You should only need to add these two lines of code (make sure you select python, not MEL!):
import fgshooter
fgshooter.ui()
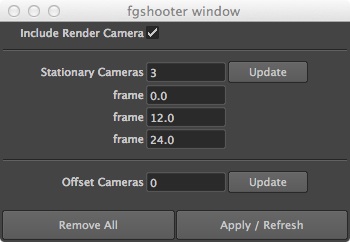
When you click the fgshooter button that you have just created on the shelf editor, an fgshooter window should pop up. This window gives you three options of how to create virtual FG cameras:
- You can create a virtual camera at the same location as the render camera (Include Render Camera).
- You can create virtual cameras that are fixed at a certain frame along the path of the render camera (Stationary Cameras).
- You can create virtual cameras that are offset in time by a few frames from the render camera (Offset Cameras).
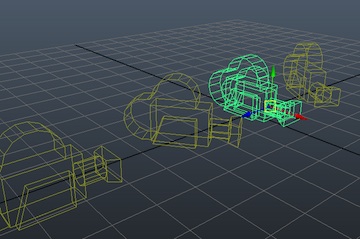
The defaults settings will create 4 virtual FG cameras: 1 at the position of the render camera and 3 stationary cameras at frames 0.0, 12.0, and 24.0. Specific settings will vary heavily scene to scene. If you wish to change from this default virtual camera setup, raise or lower the number of stationary or offset cameras and then click “Update”. The UI will now display the corresponding number of slots for each of the types of virtual cameras. When you are ready to create the actual virtual cameras and mip_fgshooter node network, click “Apply / Refresh”. Since this script is not cumulative, the entire fgshooter setup will change every time you click this button. This way your scene won’t accumulate virtual final gather cameras. You may also remove all virtual cameras/mip_fgshooter/node networks by clicking “Remove All”.
Note: This script will only create cameras for a non-default camera set as the render camera under render settings.
Offset vs Stationary
In general, the more stable the final gather points, the more stable the final gather, so it is best to use the stationary cameras in combination with the render camera. This will be particularly useful for pans where flicker is being caused by small changes in the render camera’s position and orientation. For fly-throughs where the render camera’s position changes greatly, offset cameras may be more useful than stationary cameras. These offset cameras will help smooth out flicker by providing information from a few frames ahead and a few frames behind the render camera. You should always include the render camera.
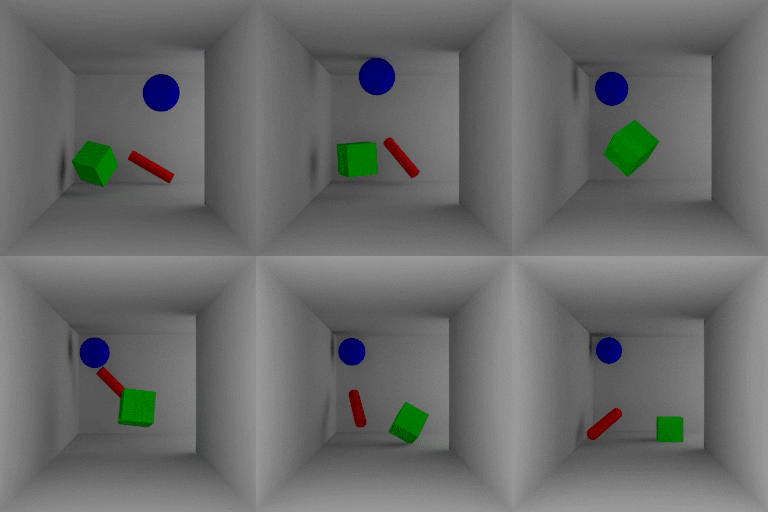
version 1.0 – posted 1/4/12 version 1.0.1 – posted 1/7/12 Animation below rendered with no lights, FG only with an animated camera and 3 fgshooter cameras (4 total) The image was tuned to the desired quality and then sent to render. No tuning for flickering was performed.Another faster example with higher contrast
Example file (may need to cut and paste, Maya 2013), file courtesy of Narann on the ARC forums: FGshooter File


