The user_ibl shaders: Part 1
Introduced with mental ray 3.10 are new shaders called the user_ibl shaders.
Inside this shader package are two new shaders with different usage scenarios.
- user_ibl_env
- A more simplified usage than the Native IBL (mental ray), the user_ibl is a scene entity used for lighting a scene globally from an environment.
- user_ibl_rect
- A shader used to generate light cards or “billboards” to replace otherwise complex geometry and lights in a scene. An example workflow is discussed with Speed Racer and Digital Domain: How to Paint a Digital Car
Part 1: The user_ibl_env
Why would you use this instead of the Native IBL with string options?
The user_ibl_env can be used as a shader in the scene. This means it can be operated and manipulated as a scene shader attached to an area light. It also improves on the importance sampling used by the Native IBL.
The shader uses a connection to a texture. This means it has direct access to all of the detail found in an HDR image. The Native IBL will bake anything (including procedurals) attached as an environment. The user_ibl_env requires a texture to work correctly. If you are using a procedural like a ramp, it should be baked to a 32-bit image format like an HDR or EXR for rendering.
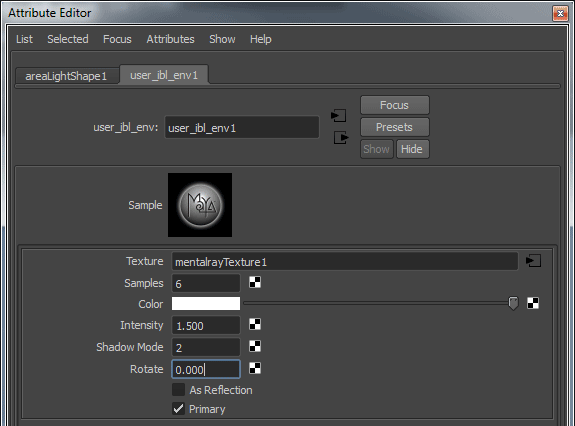
First, let’s look at the shader settings:
Texture: This is where you attach a lat-long formatted HDR or similar high dynamic range texture to be used to light the scene.
Samples: The samples used for lighting. This is the maximum number of samples used for lighting. More complex images or images with wide ranges of values may need more samples. As the importance of the sample becomes less (maybe it’s a few reflections or refractions later) the shader may call fewer than this number.
Color: A scaling factor (RGB) for the colors in the texture. You can use this to manipulate the texture colors from the shader.
Intensity: A standard multiplier for the lighting effect. 2 = twice a s bright. 3 = three times as bright, etc.
Shadow Mode: 0 = opaque 1= solid 2 = transparent The default is transparent shadows (good for images with windows or colored glass). The UI can be changed by using the enum attribute in the .mi file that will give you a dropdown menu instead of an integer field. Change the line in the .mi file regarding the shadows to this:
integer "shadow_mode" default 2, #: enum "no shadow:opaque:transparent"
Rotate: This rotates the lat-long texture for placement. This is measured in degrees.
As Reflection: Was the image being used for lighting shot through a reflection (mirror ball)? This will reverse the image to correctly integrate objects.
Primary: Visibility
How do you use this shader correctly?
There are some steps to correctly use this shader inside Maya. We’ll look at them here step by step.
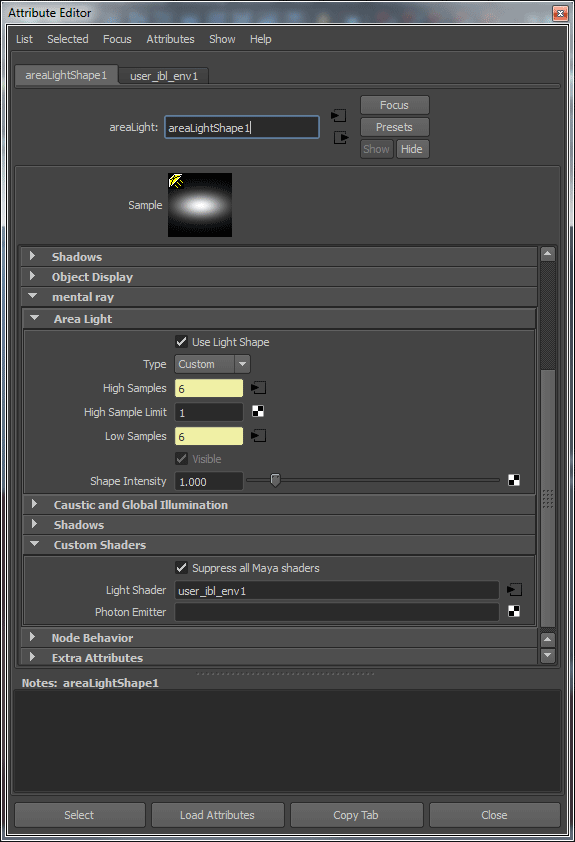
1. Create an area light in Maya. Its position and size do not matter. Under the mental ray rollout select Use Light Shape.
2. Under the mental ray ->area light rollout, Set the area light to ‘visible’.
3. Set the Type to Custom
4. Under the mental ray -> Custom Shaders attach a user_ibl_env shader to the Light Shader connection
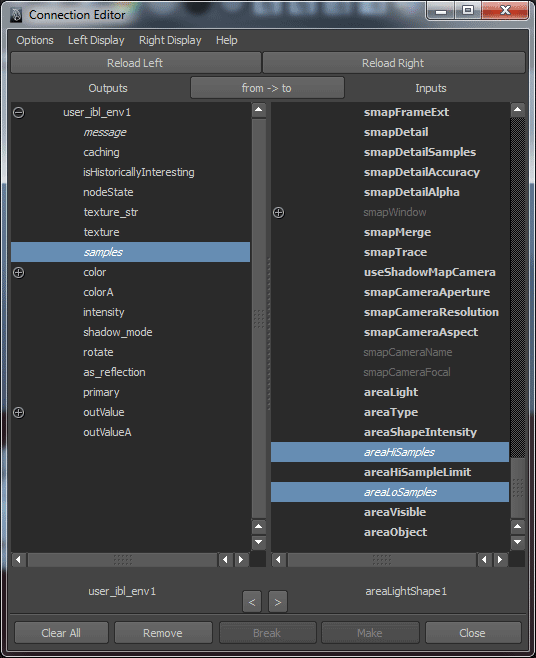
5. To keep things easy, use the Maya Connection Editor to connect the user_ibl_env Samples to the High and Low Samples of the Area Light
A final area light:
If you try to render your scene now, it won’t light as an environment. You still need to attach this shader to the Environment connection on the camera under the mental ray rollout.
Additional Notes on this connection: You can still use ray switches and the mia_envblur shader here and attach the user_ibl_env to them. Keep in mind you may need to use a large resolution setting in the mia_envblur shader to preserve detail in reflections.
Lastly, and very important: you must use the string option for Light Relative Scale for this shader to correctly scale the light for non-BSDF or older (legacy) shaders. This value is 1/pi. This is added in the miDefaultOptions.
Name: light relative scale
Type: scalar
Value: 0.318
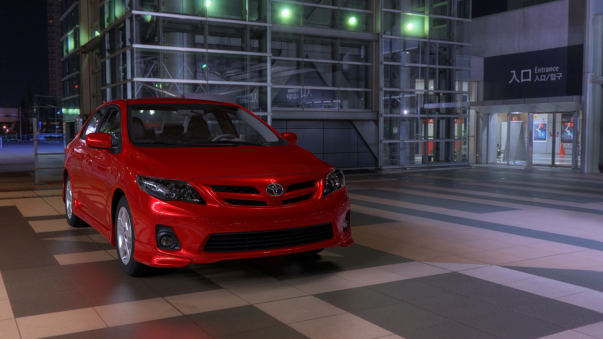
Now render with Unified Sampling. The following image was rendered using a backplate and HDR from: HDR Labs.
Additional Notes:
- In these images I did not use indirect lighting. If you do use it in such a scene, you can decrease the quality by quite a lot. Maybe 16 or 32 rays (or around there) for Final Gather.
- Insufficient samples for the user_ibl will show as grain in the image. In motion, slight grain won’t be noticed, don’t over-tune your scene.
- Avoid using any shader where it forces a specular (direct reflection) calculation from these lights. It will cause noise and increase render time.
- Do not defeat the importance sampling mechanism by making the High and Low Samples of the area light different than the user_ibl shader. Let it do the work for you.
Posted on May 7, 2012, in Lighting, maya and tagged environment, IBL, lighting, maya, user_ibl. Bookmark the permalink. 55 Comments.


Once again, very good post. Thanks a lot for all this share! 🙂
A question. When you say:
“for non-BSDF or modern shaders”
What do you mean by “modern shaders”. BSDF are supposed to be a modern shader no?
You’re right. It’s a mistype. Fixed it. 🙂 Thanks!
Ok! That’s much more understandable!
Thanks for the excellent information. Really informative. I’m planning on writing a script to automate this setup sometime soon. Hopefully I can actually find some time to make that happen.
It’s helpful if you make a script to check for and add the Light Relative Scale string option since it would be necessary in most cases. We’re not aware of a scenario where having it and not needing it would cause issues so it should be safe.
Yeah! A sanity check for “modern lighting in mr” could be very useful:
– Check “Light Relative Scale”
– Check you only use Area Light (?) with good values/connections/etc…
– Check for surrealist sampling values (the new way to deal with sampling make the use of really different sampling values than before).
– Check for only use modern shaders (but for now, there is no achi BSDF shaders right?)
– etc…
Any others ideas?
Yes, checking for and adding if not present that string option with correct values was definitely something I was going to add. I’ve forgotten that step a few times at this point. 🙂 I was going to make it a radio button in the UI just in case someone was experimenting with the BSDF shaders in conjunction with the node. I suspect most people will be just experimenting at this point because, like you pointed out and I finally had time to test and see for myself, the faceting in the diffuse channel is especially pronounced once rendered as passes. I would love for the guys at Autodesk to make use of the new legitimate plug-in setup for mental ray integration into Maya and push us out a hotfix for this quickly. This is such a useful node it would be great to be able to really use it right now with a pass set up.
I was trying to throw some sort of weight around but I don’t have an official avenue for Autodesk Support. Which is unfortunate. It’s been fixed in the framebuffers, they just have to know how critical it is. Feel free to report it. 🙂
Yea I should have reported it already to be honest. I’ve been really bad about not reporting bugs I’ve discovered. Tomorrow morning I’m going to make sure I follow through with it this time. Or I may have to kick my own ass. 🙂
#import maya and mel cmds
import maya.cmds as cmd
import maya.mel as mel
#set variable to get string options size
idx = cmds.getAttr( ‘miDefaultOptions.stringOptions’, size = True)
#create an empty list.
sList = []
#for loop that goes through the string options size and stores the names into the list variable
for i in range(idx):
sList.append( cmds.getAttr( ‘miDefaultOptions.stringOptions[‘ + str(i) + ‘].name’))
#checks to see if light relative scale is in the list
#if not it will automatically add it to the list of string options
if ‘light relative scale’ in sList:
print ‘yes’
else:
mel.eval(‘miOptionsAddNewStringOpt miDefaultOptions.stringOptions’)
cmds.setAttr(‘miDefaultOptions.stringOptions[‘ + str(idx) + ‘].name’, ‘light relative scale’, type =’string’)
cmds.setAttr(‘miDefaultOptions.stringOptions[‘ + str(idx) + ‘].value’, ‘0.318’, type =’string’)
cmds.setAttr(‘miDefaultOptions.stringOptions[‘ + str(idx) + ‘].type’, ‘scalar’, type =’string’)
There are arch BSDF materials but in a limited way for now. You have a better idea of what’s possible in iray with layered BSDFs. I think as things become more simple it will be harder to make bad choices.
However, with the choices comes flexibility which we want to maintain. So for now it’s a trade-off that a lot of people are being careful with. Rather than saying it’s “difficult” maybe it’s just “flexible”. 🙂 Means there’s a lot to learn.
Yes, but personally, it’s hard to find what good values are supposed to be set. And by “good values I don’t mean I ask myself “62 or 65?”. I mean “4 or 128?”.
The new sampling way completely change the values you need to set and “default” maya values are not good. That’s why a simple sanity check could just warn you about a sampling value you was thinking good but is actually very bad.
I don’t know if I’m very understandable… 😦
Anyway, your post are actually very interesting for this because it’s hard to imagine that 6 is a good value for area light. 😀
When searching for an acceptable value, Bart usually recommends you start too high and work your way down.
You can begin there. But I use a simple binary search like I did in the area lights post. (Actually better explained in the light threshold post.)
128 is too much, 64 is too little. Try 96 (halfway between). 96 too much? Now try 80 (halfway between 64 and 96, etc)
Every scene is so different on projects, rather than have a standard default for everything, have a good STARTING point for that type of project instead. (Rarely on something complex, even if similar, can you drop in an old default and still be perfectly happy with it.)
I see… Thanks for this.
Yes, Area 101 is a very informative post (as every one of this blog).
Regads,
Dorian
I don’t think it was mentioned in the post, but Maya’s environment ibl, mentalrayIblShape, maps environments incorrectly. This shader fixes that. However if you need to match Maya for legacy reasons you can set Rotation to 180 degrees and check As Reflection.
Interesting! Thanks for this!
I’m getting confused with yet another light relative scale option added to color management and gamma corrections nodes, lens shaders etc… I’m in need of an option that checks if I’m not doing things twice.
Light Relative Scale is independent of Linear Workflow. It has nothing to do with Gamma or color space.
It has to do with how shaders work with light (and the amount, hence, scale) and that newer shaders handle light differently. By adding this string option you ensure scenes with old, new, or mixed shader types react the same way.
This let’s you continue to use legacy methods while migrating and keeping a consistent look.
I would add the option by default for now.
Could you clarify something for me? “Avoid using any shader where it forces a specular (direct reflection) calculation from these lights. It will cause noise and increase render time.”
I’m guessing any maya base shader (blinn, phong, etc) with specularity would cause this?
Also, let’s say I’m using a mix of BSDF shaders and maya base shaders (or the mia_x) — will adding the light relative scale string option then mess up my BSDFs?
In the mia_material you can turn spec on/off or have it not generate a specular reflection for visible area lights. Other shaders you might have to turn the weight off, like the car paint, but then it doesn’t have the same look for example.
For the BSDF part, no, in fact, the Light Relative Scale was introduced so you *could* mix shaders as you begin to migrate to newer shading models. Your 50% grey mia_material and BSDF should light with the same intensity using the Light Relative Scale.
If you omit Light Relative Scale, all of your legacy shaders (including mia_material) will be too bright technically.
That’s what I thought… thanks for the confirmation!
Heya,
I really like the result of this shader. And it’s always refreshing to see a new render with my background. Thank you for respecting the CC license and adding a link back.
@justin: A script sounds awesome, but you know what would be even better? Converting this script into a setup template for sIBL-GUI and sharing it. These template are really MEL scripts with placeholders for the HDR image. That would reach a lot of people, and would also make it very convenient to build this setup for a variety of different environments. Innovative setups like these are exactly why sIBL-GUI is an open source platform.
see http://www.hdrlabs.com/sibl/framework.html
Cheers,
Blochi
Hey Christian,
That sounds like a great idea. I actually already finished the python script and am just getting a few people to test it before I release it. But your suggestion is a good one so I may go ahead and do that as well. I really like sIBL and that would be a great addition to it.
Thanks for the feedback,
Justin
I have also used the background and sibl plugin from hdrlabs.com
You can view the result here:
keep up the good work !
Hi David, hi Brenton.
First of all congratulations and thanks for your blog! it’s really helpful.
Related on the “user_ibl_env”, is it possible to use it when “Z” is up? I’m trying to do it without succes…, I’m gonna try it a little bit more. 🙂
Thanks! keep it up.
It only rotates around the Y-axis. However, you can use a different environment for the Native (builtin) IBL. This will bake the Maya IBL environment which can be rotated. (Note that this Native IBL is string options, not the Maya “emit light” option)
Max Tarpini has also provided a new and nice environment shader here:
http://forum.mentalimages.com/showthread.php?3789-mib_lookup_spherical&p=42364#post42364
4. Under the mental ray -> Custom Shaders attach a user_ibl_env shader to the Light Shader connection.
Where did you go to load the ibl_env_shader into the left hand side of the Connection Editor? I also tried to click on the Light Shader swatch, and a Create Render Node window opens. But I don’t see the user_ibl_env
Be sure you’re using Maya 2013. It’s not included with 2012.
How you doing David..Like always thx for your post.. I would like to get into using the user ibl env shader but my concern is that u cant see the result of rotating it unless u rendering unlike using the native ibl.. are u using this shader in conjunction with progressive rendering perhaps?
To be honest, we stick to the Native IBL much more often than the user_ibl_env for global lighting with an HDR.
thx David!!
Interesting 😀 I tried this user_ibl_env shader today, it seems to respect better the colors, though it’s slower.
My last test renders :
native IBL > 0m55s
user_ibl env > 4m53
mip_rayswitch+user_ibl env > 1m45
I used many materials in the same scene, mi_metallic_paint, mia_material, blinn. I didn’t really understand about the Light Scale, cuoldn’t find where it is… I’ll have to read the post again and again 🙂
The Light Relative Scale is a string option. It is in Maya 2014 by default and set correctly. Otherwise you have to add it yourself.
The color comment is interesting. I’m curious if maybe you should increase your Native IBL resolution and/or shader samples and see if it changes or matches user_ibl_env better.
About the colors i say that because i used a white metallic_paint with blue flakes, the environnement is kinda light gray so with native IBL it sort out light gray when with user_ibl i can finally see the blue, maybe too much it’s hard to say. I’m not very good at this but i do love testing 🙂


I used a lot of light samples (128) to mak the grains go away so i should take that down a bit for less time rendering, obviously. I don’t really understand how it’s supposed to affect the colors for the IBL but… I will try anyway o_o There’s so much to learn.
For now here some pictures of the actual tests :
So, which one looks more correct ^_^
Hi, really interesting article so thanks for posting it however im having an issue and I cant seem to resolve it. When ever I try to connect the ibl to my area light, it wont make the connection (no purple arrow between the light and the ibl) ive tried drag and drop and ive tried it via the connection editor but it just isnt happening. Maybe theres bug on my Maya or maybe im just being stupid. Any advise really would be appreciated. If you could reply to seansmith089@gmail.com that would be great.
Thanks in advance,
Sean
Do you get an error using the connection editor?
Is there a way to make this work with fur? Or is that not possible. I’m trying to render some fur but it turns out completely black. I’m not really a mental ray expert so maybe I’m missing something.
Thanks!
It depends, in some cases the shaders ignore environment contribution but I’ve not had that issue with Maya hair/fur that I know of (although we don’t really use that) You can use a trick by adding an override attribute to replace the Maya shader with something else like mia_material or Puppet’s (Pavel’s) hair_TK shader.
Here’s a nice tutorial for that:
http://inpyo3d.blogspot.com/2012/04/flexible-shading-on-maya-fur-and-hair.html
Hi David,
Thanks for your reply. I tried it with the tk_hair shader but not like it’s mentioned in the tutorial you posted. I’ll try that way as well. I guess I’ll have to find a way around the problem. What would you suggest for using fur and hair? Shave and a haircut perhaps? Anyways thanks a lot for your help.
Did you make sure to connect the shading group node of the replacement shader, not the shader itself?
I tried the way the tutorial explained and plugged in a mia shader and that seems to work. The pHair_tk shader however is not giving any results so it’s probably the shader. I have to look into the shader a bit more. Maybe I’m missing a setting or something. Again thanks for your help.
Hi David,
I’ve a problem with shadow mode 2 in my scene, because the user_ibl_env not work with refractive material or solid transparent shadow. I’ve used mia material x, dielectric material, maya lambert etc, but I always have the same result: there is not the shadow.
Do you can help me?
Thanks!
I’ve not had that issue. I would stick to mia_x_passes unless you’re in Maya 2015 and then I would use MILA. user_ibl_env is deprecated in favor of the Environment Light (Native IBL) in any event.
Hi David,
I have used this method in Maya, just wondering have you tried the same method in 3ds Max? (without Final Gather)
I haven’t actually tried this in Max. We use Maya for production and run Linux, so there are no licenses of Max to play with. :-\
Cheers for the reply David. Ah right. Hopefully the same thing is doable without FG in Max. I mean to be able to use an ibl to get lighting & directional shadows without having to turn on FG. Great blog by the way!
Newer versions of Max expose the Builtin IBL, this is a similar method to use as the environment light. You don’t need the user_ibl shaders.
David
Do you know if the user_IBl_env node works in Maya 2016? I set it up as in previouse versions but am not getting reflection data.
Thanks
Phil
David, Great work. Thank you for sharing, Quick question. Do you know if the user_ibl_env node works the same in Maya 2016. I have used it in previous versions with great success but cannot get good results using it in 2016.
Thanks in advance for any help
Phil
Pingback: Your car was built in mental ray « elemental ray
Pingback: “My render times are high? How do I fix that?” « elemental ray
Pingback: The Native (Builtin) IBL « elemental ray
Pingback: The Layering Library (MILA) UI: BETA SHADERS « elemental ray
Pingback: Object Lights – mental ray 3.11 | elemental ray
Pingback: Like a Boss | elemental ray